I am using the stunning art of Rebecca Sinz which you can purchase from AMI
http://artisticmindsinc.com/index.html
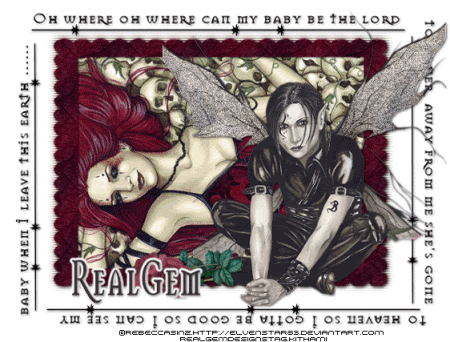
I used the image of Bed of Skulls and the tube Jahyel
My Supplies
http://www.4shared.com/file/101796430/7cb349ed/where_oh_where_tut.html
I made the frame and the wordart for this tutorial
Font used is Mason which is a free font and I have included it in my supplies.
Lyrics used a little changed are from a awesome song by Pearl Jam
No outside filters are used.
Lets Get Started
Open a new transparent image 600x600 pixels and then use your flood tool and fill it with white we are working a little big but we will crop down to size at the end
Open the Gem frame and centre in canvas using your selection tool set on selection draw out the frame as below

Open the Bed Of Skulls image and resize to 85% smart size all layers unticked and then paste as a new layer on top of the frame then up to selections invert hit delete on your keyboard this takes the excess off up to selections select none now arrange the layer so the image is under the frame close off the white layer and merge visible on the frame and the image.
Now duplicate the merged framed image on the copy go to adjust blur gaucassian blur 4.00
Then up to effects Textures blinds
Colour ecddc3
Width 3
Opacity 100
Horizontal and from left to right both ticked
Now layers arrange and move this under your original image
Now copy and paste the Gem wordart as a new layer
and then open the Gem horizontal line paste as a new layer to the top then to image duplicate and move the 2nd one to the bottom
Open the Gem side line copy and paste to the side and then image duplicate then image mirror to give you one on each side
Now for our Jahyel tube open the tube up and go to canvas resize to give yourself room to work now using your selection tool set on freehand draw out a piece of his full wing on the right hand side then up to edit paste as new layer
(note if you can use clone brush please do I don't have a clue on it LOL)I also used my selection tool to take off the rose that is next to him
Now paste the wing you have selected on to the left wing and then go to your smudge tool with these settings and lightly brush the wing so it matches in with the other one once you are happy with it merge visible layers and resize down to 80% smart size all layers unticked
Now paste to the Bed of skulls tag as a new layer move him into place
Once you have moved into place open the Rainbow Coffi roses which I have recoloured paste as a new layer and then image mirror
Add a light dropshadow to everything I used
H1V1 opacity 55 blur 4.00
Now if you don't wish to animate your tag is ready to add your credits and fonts I used eyecandy 4 glow on my text settings fat size 3.00 soft corners 25.opacity 100 draw outside ticked.
Now using your crop tool resize to suit yourself
Animation
Using your selection tool on magic wand with these settings
Add/shift RGB Value Tolerance 15 continous ticked antialias ticked outisde
Now hold down your shift click and click into one of the wings you will need to keep clicking until you see the marching ants going completely around the wing with no breaks in between then do the same for the other wing
Once you are happy go to adjust add noise at 30% monochrome ticked once you have added the noise up to selections select none
Edit copy merged into animation shop as a new animation
Back to PSP Click undo until you have the wings without the noise then repeat noise at 34% then selections select non edit copymerged paste into animation shop after current frame
Then repeat but add the noise at 36% once you have 3 frames into animation shop go to animation animation properties and change to opaque make the colour white then up to view view animation and then save as a gift file
I hope you have enjoyed this Tut
RealGemDesigns Tut written 26 of April 2009 Tut Registered with TWI
Join my forum
http://forum2.aimoo.com/PSPRealmsOfFantasy11


No comments:
Post a Comment